Sunday, October 30, 2011

Popcorn Balls

Happy Halloween Everyone! I hope you are all having a spooktaular day!
I made a treat, popcorn balls! I remember eating these as a kid. I loved them.


I added Reece’s Pieces to kick up the Halloween flare!


They are super cute and tasty!

What you need,


1 cup of unpopped popcorn
¾ cups white sugar
¾ cups brown sugar
½ cup light corn syrup
½ cup water
2 tbsp. butter
1 tbsp. apple cider vinegar
¼ tsp. baking soda

Pop the popcorn and remove any un-popped kernels. In a saucepan, combine the white sugar, brown sugar, corn syrup, water, butter and vinegar. Cook mixture over medium heat until it reaches soft ball stage, 240 degrees. Remove from heat and add in the baking soda. Pour over the popcorn and stir to coat. Stir in the Reece's pieces.  Spray your hands with non-stick cooking spray and form into balls. You will have to spray your hands every 2 or 3 balls or it will start to stick! You don’t want that!

Set on some wax paper to firm up.
Wrap tightly in saran wrap for up to a week.


I am lucky enough to be visiting my parents and my sister in Regina this week, which means I get take my niece trick or treating tonight. I am very excited!

I hope you all have a great Halloween!

Jen

Thursday, October 27, 2011

Favourite Things Friday Vol. 9

Every year my in house taste tester and I carve pumpkins for Halloween!


It is just one of the many nerdy things we like to do together. I love it!!


I am no artist so mine are usually pretty lame. My sweet is the creative one; he always does something funky… this year he did the death star, from Star Wars.
Cool!!


My favourite part of the whole experience is roasting the pumpkin seeds. YUM!


Sift all the seeds out of the pumpkin guts. Rinse them well under cold water and pick out any pumpkin bits.
Spread on a sheet pan and let them sit out over night to dry out.


Once they are dry, toss with 1-2 tbsp. of olive oil and 1-2 tsp. seasoning salt, 1 tsp. garlic powder and ½ tsp. pepper. Heat your oven to 250 degrees.
Spread the spiced seeds out in a single layer and bake in the oven for 1 hour, stirring every 20 minutes. 


They are crunchy and salty, the perfect Halloween snack!

Happy Friday Everybody!!

Jen
Tuesday, October 25, 2011

Roasted Fall Vegetables

I am totally loving all the fall food right now. It is so comforting. I have been roasting a lot of veggies lately; they a perfect side dish with just about anything.


I always make a lot of them that way I have lots left over. They are fabulous,  you can use them in a salad or on a pizza with some goat cheese or add to some quinoa with a simple vinaigrette. They possibilities are endless.

Here is what you need,


½ small butternut squash
1 medium sweet potato
3 small red potatoes
3 medium carrots
8 cloves of garlic
1 small red onion

3 tbsp. olive oil
1 tsp. salt
½ tsp. pepper
1 large spring of fresh rosemary

Heat your oven to 350 degrees.
Cut all the veggies into a small dice; try to make all of them close to the same size, that way they will all cook evenly. Peel the loose skins off the garlic but leave each clove in the tighter skin.
Coat the cut veggies with the olive oil and salt/pepper.
Spread out on a sheet pan in a single layer and roast for 25-30 minutes. Stir the veggies around and roast for another 25-30 minutes until fork tender.


So so good!! Just squeeze the lovely garlics out of their skins and they are heaven.
You could also use parsnips or turnip or any other kind of squash you like.

Roast some veggies tonight, you will love them!

Jen


Sunday, October 23, 2011

Pumpkin Whoopie Pies with Maple-Cream Cheese Filling

I can’t believe that we are only a couple of weeks away from Halloween. Where is the time going? I decided I better get making some Halloween treats.


When I saw these Pumpkin whoopie pies with maple-cream cheese filling on the Brown Eyed Baker’s site I knew that they were first on the list.


These are so good! The cookies are moist and cakey and the filling, oh man don’t get me started!

What you need for the cookies,


3 cups all purpose flour
2 tbsp cinnamon
1 tsp baking powder
1 tsp baking soda
1 tsp salt
1 tsp ground ginger
½ tsp ground nutmeg
1 cup granulated sugar
1 cup dark brown sugar
1 cup canola oil
3 cups chilled pumpkin puree
2 eggs
1 tsp vanilla extract

What you need for the maple cream cheese filling,


3 cups powdered sugar
1 block of cream cheese (8oz)
½ cup butter, at room temperature
3 tbsp maple syrup
1 tsp vanilla

Start by preheating your oven to 350 degrees. Line a baking sheet with a silpat mat or parchment paper.

In a bowl whisk together the flour, cinnamon, baking powder, baking soda, salt, ginger and nutmeg. Set aside.

In a separate bowl, whisk the granulated sugar and brown sugar together with the oil. Add the pumpkin puree and whisk to combine. Add the eggs and vanilla mix well.

Slowly add the flour mixture to the pumpkin mixture and whisk until well blended.

Use a small cookie scoop to drop a rounded tablespoon of dough onto the silpat mats about 1 inch apart.

Bake for 10-12 minutes, until a toothpick comes out clean, cookies should feel firm. Cool completely on a wire rack.


To make the filling beat the butter on medium speed until smooth, then add in the cream cheese until smooth and fully combined. Add in the powdered sugar a little at a time until well blended. Add in the vanilla and maple syrup. 


Spread about a tablespoon of the filling on one flat side of a cookie and sandwich another cookie on top.

Put the cookies in the fridge for 30 minutes to firm up before serving.


These are the perfect fall treat. I wish I was having a Halloween party these would be perfect for that!

Delish!

Jen


Thursday, October 20, 2011

Favourite Things Friday Vol. 8

My favourite thing this week is this super amazing Thermapen meat thermometer.

It is made by ThermoWorks, www.thermoworks.com.

This thing is amazing, It takes a reading instantly, it is easy to clean and it is super accurate.
I have used it so much since I got it as a Christmas present from my in house taste tester.

I don’t know what I would do without it; I no longer overcook my meat, which is great!


They are a little pricey but totally worth it!!

Check them out!

Jen

Wednesday, October 19, 2011

Crispy Baked Fish Sticks with Homemade Tartar Sauce

Back when I was a teenager I didn’t cook, at all. If I had to make dinner it was usually fish sticks from a box and McCain’s French fries. Fancy!

Now that I enjoy cooking more I make my own fish sticks. These are super crispy and full of flavour, way better than those bad grocery store ones. The homemade tater sauce is amazing!

What you need for the fish sticks,


1 large egg, lightly beaten
Salt and Pepper to taste
2 cups of Panko bread crumbs
1 tbsp old bay seafood seasoning
2 tbsp olive oil
1 ½ lbs of tilapia fillets cut into strips. (You could use any firm white fish you want)

Preheat your oven to 475 degrees. Place the egg in a shallow bowl and season with salt and pepper. In another shallow dish mix the panko crumbs with the olive oil and old bay seasoning.
Dip the fish pieces into the egg mixture; let the excess drip off, then press into the crumb mixture until well coated. Place the coated fish onto a baking sheet, leave ample room between each piece, this will allow for better crisping.

Bake without turning the fish for 12-15 minutes or until browned and the fish is cooked through.

For the tarter sauce you will need,


½ cup mayo
½ cup Greek yogurt
1 large dill pickle, finely diced
1 tbsp capers, drained and chopped
½ a lemon, juiced
1 tbsp sweet pickle relish
1 tsp old bay seasoning
Dash of Tabasco
Salt and Pepper to taste

In a small bow combine all the ingredients together and mix well. Adjust the seasoning to your taste. Let it sit in the fridge for 1 hour or overnight to let the flavours combine.


I love these fish sticks, they are a huge step up from my Captain Highliner days!


So easy and so quick, another perfect weeknight meal!

Jen

Recipe adapted from Martha Stewart Everyday Food

Monday, October 17, 2011

Skillet Baked Spaghetti

I have been super bad about making weeknight dinners the last couple weeks. I just haven’t felt very motivated. I was starting to get sick of grilled cheeses and toast with cereal so I decided to buck up and get back to it.

I went through some of my millions of cooking magazines for some inspiration. When I saw this recipe in Cook’s Country Skillet dinners I knew I had to make it asp!


This skillet baked spaghetti was awesome. Super easy, defiantly quick enough for a weeknight and my in house taste tester literally gave it 2 thumbs up!

Here is what you need,


12 oz lean ground beef
4 oz hot Italian sausage, removed from the casing
4 cloves of garlic, minced
1/8 tsp red pepper flakes
¼ tsp dried oregano
1 - 28oz can crushed tomatoes
8 oz spaghetti, broken into 2 inch pieces
2 cups of water
1 ½ tsp salt
¼ cup heavy cream
6 tbsp finely chopped fresh basil
1 cup Kraft shredded Italian cheese

Start by adjusting your oven rack to the upper middle position and heating the broiler.

Cook beef and sausage in an oven safe non-stick skillet over medium heat.

Note: I don’t have an oven safe skillet, so I had to cook everything in my regular skillet then transfer it to an oven safe baking dish. This worked just fine! But an oven safe skillet is going on my Christmas list!!

Once the meat is browned and no longer pink, transfer it to a paper towel lined plate. Pour off all the fat from the skillet. Return the browned meat to the skillet and add the minced garlic, pepper flakes and oregano. Cook until fragrant, about 1 minute.

Stir in the tomatoes, spaghetti, water and salt. Cover and cook, stirring often, until the spaghetti begins to soften this should take 7-8 minutes. Reduce heat to medium low and continue to simmer, covered, until spaghetti is el dente, another 7-8 minutes.

Stir in the cream, basil and 1/3 cup of the cheese.

Sprinkle the remaining cheese on top and put under the broiler for 3-5 minutes, or until the top is browned and bubbly.

Let stand for 5 minutes and serve.


I was surprised at how much flavour this dish has! That little bit of Italian sausage sure adds a nice kick and all that fresh basil, well you just can’t go wrong!

A nice side salad and this is another perfect weeknight meal!

Jen
 
Recipe from Cook's Country-Skillet Suppers Magazine

Saturday, October 15, 2011

Chocolate Caramel Cookies with Sea Salt

These cookies are ridiculous! Crazy Insane Ridiculous!

They are super chocolaty and gooey and that little bit of salt, WOW!


If you are looking to make amends for something, make these. They will make up for anything!!


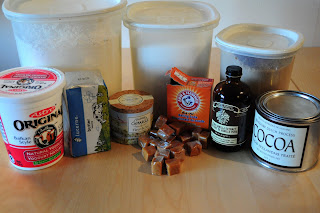
What you need,


1 ¼ cups all purpose flour
¼ tsp baking soda
¼ tsp salt
5 tbsp butter
7 tbsp unsweetened cocoa powder
2/3 cup granulated sugar
1/3 cup packed brown sugar
1/3 cup plain yogurt
1 tsp vanilla
Soft caramel, rolled into little balls
Sea salt

Preheat the oven to 350 degrees. Line 2 baking sheets with silpat mats.

Whisk the flour, baking soda and salt together in a large bowl.

In a medium sauce pan over medium heat melt the butter. Remove from the heat and stir in the cocoa powder and both sugars. Add in the yogurt and vanilla, stirring to combine. Mix into the flour mixture stirring until moist. Wrap a scoop of the dough around one of the little caramel balls. Place on the baking sheet and sprinkle a little sea salt.

Bake for 10-12 minutes or until almost set. Cool on the pan for 2-3 minutes or until slightly firm. If you take them off the pan too soon all the caramel leaks out!

Remove cookies to a rack and let them cool completely.


These cookies are best warm they are like little molten lava cakes of deliciousness!


I don't know what else to say, except MAKE THEM! You will not regret it, or you might if you eat 6 like I did. I need to go to the gym now.

Jen

Thursday, October 13, 2011

Favourite Things Friday Vol. 7

Today is my Dad’s birthday!  I decided for my favourite thing this week I would share something that I love to do with him, fishing!


I have spent a lot of time in my life in the boat with my dad. I love it!!
He is a great fisherman, we always catch something.

This is how it used to go circa 1989… get up early early (6am) drive to the lake, put the boat in the water, put on my awesome neon shades and get out my Fear Street book, wait for something exciting to happen!


I don’t’ have the neon shades anymore and I have moved on from Fear Street but basically the scenario is the same!


A few years ago we went salmon fishing in Tofino, it was so great. Dad caught some huge fish. He was in heaven.


Then a at my sister’s wedding in Maui we went deep sea fishing. Dad caught this Mahi Mahi, it was very cool!


I love spending time on the water with my Dad, he is the best.

Thank you so much Dad, for always taking us with you, for baiting all our hooks, for cleaning all those fish and for teaching us how to keep the rod tip up and reel down!


Happy Birthday Dad! I hope you have a great day!
I can’t wait until our next fishing adventure.


Jen


Tuesday, October 11, 2011

Giardiniera

As soon as I saw this recipe on Tasty Kitchen I knew I had to make it! Pickled spicy veggies are right up my alley!


They were easy to make and super tasty!!


What you need,


2 whole jalapenos, sliced
1 whole red pepper, sliced
½ cup carrots, sliced
2 stalks celery, sliced
1/2 head cauliflower, cut into small pieces
¼ cup salt
1 quart water
¼ tsp garlic powder
3 tsp oregano, dried
¼ tsp red pepper flakes
¼ tsp celery salt
½ tsp black pepper
¼ cup olive oil
¼ cup white vinegar

Start by chopping all your veggies and put them in a large bowl.
Add ¼ cup of salt and add enough water to cover all the veggies, about 1 quart.
Allow the veggies to soak in the brine for 8-12 hours.

Drain and rinse the veggies. In a small bowl combine the garlic, oregano, red pepper flakes, celery seed, pepper, oil and vinegar. Spoon the veggies into a large mason jar, pour the spice mixture over the veggies and screw the lid on tightly. Shake until all the veggies are coated. Refrigerate for at least 24 hours.


After a day or 2 they are ready to eat. They are crunchy and spicy and perfect!


I love them!!


They go great with everything, or just eat them right out of the jar, like I did!

Jen


Recipe from Shugary Sweets off of Tasty Kitchen


Monday, October 10, 2011

A Very Non Thanksgiving Post...

It is Thanksgiving today, here in Canada.
You would think I would be posting some kind of huge thanksgiving dinner, turkey and all the fixin's, but  nope...
I spent the whole weekend here,


In Las Vegas! I was down there to see Garth Brooks, which was awesome by the way!!
If you are in Vegas, I would highly recommend his show! Even if you aren't a huge country music fan, it is one of the best shows I have ever seen!
He is so funny and he sounded great! LOVED IT!!

We stayed at the Aria, it was awesome!!


It smelled like vanilla waffle cone in the whole hotel, yum!
Our room was AH-MAZING!


We lost some money the slot machines, had a few cocktails and we went to the titanic exhibit at the Luxor hotel, which was very cool!
Then we pretty much just walked around and looked at everything!


We didn't get back until late last night, so I am doing my big dinner tonight, which means no pictures, yet!
But it is starting to smell like roasted turkey in here now! Oh boy am I ever looking forward to it, especially after eating out all weekend.

I hope all my Canadian friends had a great thanksgiving. I am so thankful for my amazing family and friends and for all of you for taking the time to read my little blog!!
I love you guys!!

Happy Thanksgiving everyone!

Jen