Sunday, August 12, 2018

Hawaiian Chicken Kebabs


Summer is zipping by so fast, too fast! I have been trying to up my grilling game by making some new recipes. These Hawaiian Chicken Kebabs are my favorite so far! MAN, they were FANTASTIC!
So much flavor, easy to prepare and fresh pineapple which is always a win for me!


Look how pretty they are… the marinade makes such a sweet sticky sauce, so amazing!


What you need,

For the marinade,

1/3 cup ketchup

1/3 cup dark brown sugar

1/3 cup soy sauce

¼ cup pineapple juice

2 tbsp. olive oil

1½ tbsp. rice vinegar

4 cloves garlic minced

1 tbsp. freshly grated ginger (I love fresh ginger a lot, so I probably added 1½ tbsp.)

¼ tsp. black pepper

For the kebabs,

1 lb. chicken breast or thighs cubed into 2-inch cubes

3 cups fresh pineapple cubed into 2-inch cubes

1 large red pepper cut into 2-inch pieces

1 red onion cut into 2-inch pieces

In a medium bowl whisk together the ketchup, brown sugar, soy sauce, pineapple juice, olive oil, rice vinegar, garlic, ginger and black pepper.

Place the cubed chicken in a large zip top bag and pour over half the marinade. Rub the marinade well all over the chicken and stash it in the fridge for at least an hour and up to 4 hours.

Meanwhile you can slice up the fresh pineapple cubes, the red pepper and the onion.

When you are ready to make the kebabs use wooden skewers or metal (if you use wooden make you soak them in water for an hour or so, that way they won’t burn on the grill)

Alternate the onion, peppers, chicken and pineapple onto each skewer.

I like the pineapple, so I really loaded that on!


When you are ready to cook heat your grill to medium high heat.

Cook the kebabs for about 4 minutes on one side. Flip and baste the cooked side with some of the reserved marinade. Then cook the second side for about 4 more minutes, then flip and baste that side.

Cook for 2 more minutes on each side, basting each time you flip. They should get sticky and brown and wonderful.

Carefully remove the skewers from the grill and serve over rice.

I have to say that these might be the BEST kebabs I have ever had! Everything cooked up perfectly and because everything was cut to the same size it was evenly cooked.


The sauce on these kebabs is amazing! Super flavorful, and full of sweet and sour and spice. I will be making these again for sure!

They were a hit in my house!


Enjoy!


Jen


Recipe slightly adapted from Cooking Classy

Sunday, July 15, 2018

Roasted Mushroom & Asparagus Quiche


Growing up in the 80’s I remember quiche being a big deal. I remember everyone making it and it was kind of a big thing if you could get your husband to eat it. I don’t know why anyone wouldn’t want to eat quiche. It is amazing! Or at least this one was.

The roasted veggies were tender and full of flavour. The nutty Gruyere cheese goes great with the egg. It was just a winner all around in my opinion.

I served it with a simple baby green salad with cranberries and pumpkin seeds and a light balsamic vinaigrette. It was the perfect accompaniment.

Even the hubs loved it, so I guess I win!!


What you need,

2½ cups mushrooms, sliced or quartered (I used a mix of cremini and white button)

2½ cups asparagus, cut into 1-inch pieces

1 small shallot diced

½ tsp. dried thyme

½ tsp. salt

¼ tsp. pepper

2 tbsp. olive oil


3 eggs

1 cup half & half

1 ½ cup Gruyere cheese, grated

1 tsp. salt

½ tsp. pepper

1/8 tsp. grated nutmeg

1 deep dish pie crust, I bought mine because pie crust scares me! 

Heat the oven to 400 degrees. Toss the mushrooms, asparagus and shallot with the olive oil, thyme and salt & pepper.

Spread in single layer on a sheet pan and bake for 15-20 minutes or until the veggies golden and softened.

Turn the heat on the oven down to 375 degrees.

In a large bowl whisk together the eggs, half & half, salt, pepper and nutmeg.

Layer the cheese onto the bottom of the pie crust. Sprinkle the veggies over the cheese in an even layer.

Pour the egg mixture over the veggies, be careful it doesn’t over flow. I like to put my pie plate on a sheet pan, just in case.

Bake for 45 minutes or until the crust is golden and the egg is set.

Let the quiche stand for 10 minutes before serving.


This quiche was amazing! Seriously, I LOVED it! It is great hot, room temperature even cold.

It would make a great brunch, lunch or dinner.

I can’t believe it took me this long to make a quiche, I think I will be making them much more often now. I think ham and cheese, or broccoli and bacon would be awesome.

What are your favorite quiche fillings??


Enjoy!


Jen


Sunday, July 8, 2018

Blueberry Crumb Muffins


Well my grand plans of posting a recipe once a week seems to have gone by the wayside…

How was my last post in April?? Like seriously time is flying by.

I am making my big comeback with yet another muffin recipe, shocker!

This is a really good one, fresh blueberries a crunchy cinnamon topping, that is hard to beat!


What you need,
Click Here To Print

Makes 12 muffins

For the muffins,

1 ½ cups all purpose flour
1 tsp. baking soda

1 tsp. baking powder
½ tsp. salt
1 cup mashed ripe banana (I had 2 large bananas)

¾ cup granulated sugar
1 egg
1/3 cup butter, melted
1 cup fresh blueberries

For the topping,

1/3 cup brown sugar, packed 
2 tbsp. flour
¼ tsp. ground cinnamon
1 tbsp. butter, softened

Start by heating the oven to 370 degrees. Line a muffin tin with paper liners, or spray liberally with non-stick spray.

In a large bowl, stir together the banana, sugar, egg and butter until smooth and fluffy.

Add in the flour, baking soda, baking powder and salt. Fold to just combine.
Toss in the blueberries and carefully stir them into the batter. 
In a small bowl mix the topping ingredients together until light and crumbly.
Scoop the batter into the prepared pan and top each muffin with a teaspoon of the topping.
Bake for 18-20 minutes until golden brown and crisp on top.
Let the muffins cool in the pan for 5-8 minutes then carefully remove them to a wire rack to cool completely.


Store in an airtight container for 3-4 days or you can freeze them. They likely won’t last that long, they are truly delicious!


This muffin recipe would be great with any seasonal fruit, raspberries, chopped peaches or nectarines, plum, cherry!! You get the idea…

Glad to be back, let’s see if I can get another post out next week. Don’t hold your breath, but I am hopeful!


Enjoy!


Jen


Saturday, April 7, 2018

Individual No Bake Lemon Cheesecakes


I whipped up these amazing little cheesecakes for Easter dinner last week.

I knew I wanted lemon, and I knew it had to be easy and this delightful little recipe was the perfect thing.

A total of 5 ingredients… and no bake, and totally utterly delicious!


I changed 2 things from the original recipe, first I used Biscoff Cookies instead of Graham Crackers for the crust and I will tell you it was the right thing to do… Biscoff is the new Graham for sure!

I also added an extra lemon, because I LOVE my lemon desserts very lemony!


What you need,

¾ cup Biscoff cookie crumbs (I used about ¾ of a package of cookies and just smashed them into crumbs)

2 tbsp. melted butter

1 can condensed milk (the full fat one please!)

8oz. cream cheese (again, full fat, just do it!)

Juice & Zest of 2 lemons

Whipped cream for topping (optional, but not really optional!)


In a small bowl stir the butter into the Biscoff crumbs until they are moist and totally coated.

Divide the crumbs between 4 small dishes and press lightly into the bottom. Don’t press to hard just loosely packed is good.

In a medium bowl use a hand mixer to whip up the cream cheese and condensed milk until light and creamy.

Mix in the zest and juice until well incorporated.

Divide the batter between the small dishes.

Cover the dishes and refrigerate for at least 6 hours, but overnight is even better.

Top with a little (or a LOT) of whipped cream right before serving.


How cute are these! Add a slice of lemon or a little flower and it really would be a perfect dessert for any spring or summer dinner!


Enjoy!


Jen

Sunday, March 4, 2018

Bakery Style Chocolate Chip Muffins


Sometimes I feel like the only recipes I post on the blog are pasta or muffins… I obviously lean toward certain foods!

As a teenager I worked in the Mall, and at one point I was buying a muffin every single day. They were always so good… way better than I ever had a home. They were more like cake than a muffin, which tasted great but wasn’t so great for the waistline!

These muffins taste just like those Mall muffins… crisp on the outside, super tender and light in the middle and full of melty chocolate chips.


What you need,

2½ cups all-purpose flour

2 tsp. baking powder

1 tsp. baking soda

¼ tsp. salt

½ cup butter, at room temperature

1 cup granulated sugar

1 tbsp. vanilla

2 large eggs

¾ cup buttermilk

¼ cup sour cream

1 cup mini chocolate chips + more for sprinkling on the top


Preheat the oven to 475 degrees. Grease a muffin tin well with non-stick spray.

In a small bowl whisk together the flour, baking powder, baking soda and salt.

In a large bowl beat the butter and sugar together until light and fluffy, about a minute or two.

Add in the eggs one at time and beat well. Add the vanilla and stir until well incorporated.

Add the buttermilk and sour cream and gently fold in, until just combined.

Add the dry ingredients to the wet and fold just until combined, add the chocolate chips then give a couple more turns with the spatula.

Divide the batter between the muffin cups. Fill them right up to the top.

Sprinkle a few extra chocolate chips on the top of each muffin.

Bake at 475 for 5 minutes, then turn down the oven to 375 and bake another 13-15 minutes. The muffins should be golden brown, and a toothpick should come out clean.

Let the muffins cool in the pan for a couple of minutes, then transfer to a wire rack to cool completely.

These muffins are best served same day, but they do freeze well. Just wrap each muffin individually in saran wrap and place in a large zip top bag and place in the freezer.


Make the muffins, eat the muffins… You won’t be sorry, I promise.


Enjoy!


Jen

Saturday, February 24, 2018

Tortellini Alfredo with Spinach & Sundried Tomatoes

I swear I should have been born Italian… I just can’t get enough pasta. I try to eat other things, I really do, but I always come back to pasta.


My favorites always end up being simple with 4 or 5 ingredients and they always come together super fast. 


This Tortellini Alfredo with Spinach and Sundried Tomatoes fits the bill. It took less than 15 minutes and it is beyond delicious.

I love the salty sundried tomatoes with the creamy sauce… So very good.


What you need,

1 lb. fresh cheese tortellini

1 tbsp. butter

1 small clove garlic, minced

2 tbsp. flour

1 ¼ cup heavy cream

½ tsp. salt

½ tsp. black pepper

1/3 cup Parmesan cheese + more for serving

5 oz. baby spinach, thinly sliced

7oz jar of sundried tomatoes, drained and thinly sliced

½ - ¾ cup of the pasta cooking water

In a large pot of boiling water cook the tortellini according to package directions. When you drain the pasta be sure to reserve about a cup of the cooking water.

In a large skillet melt the butter over medium heat. Add the garlic and cook for one minute.

Add the flour and cook for 1-2 minutes stirring constantly.

Whisk in the heavy cream. Season with salt and pepper. Let the mixture simmer for a minute or 2 until it starts to thicken.

Stir in the Parmesan cheese.

If the sauce looks a little too thick, whisk in some of the reserved pasta water. I probably ended up using just over half a cup. I like my sauce on the thinner side, but if you like it thicker that is ok too.

Add in the spinach and sundried tomatoes and cook for 1-2 minutes until warmed through.

Serve right away with a little added Parmesan cheese.


This pasta was beyond delish! I ate it for supper and then had 2 lunches for the week.  It warmed over well, which isn't always the case with creamy pasta.

I will be making this again for sure. A little cooked chicken in there would be good too, if you like that sort of thing…


Enjoy!


Jen


Recipe from the amazing Brown Eyed Baker


Sunday, February 11, 2018

Overnight Oatmeal


I know I am like 4 years late to this overnight oatmeal party, but hey better late than never!

I never ate oatmeal growing up, something about it being all warm and squishy never really floated my boat. But as I have gotten older my tastes have matured and I decided to give them a try.


I really like the concept of being able to prep the oats the night before. I do not have much time in the morning so cooking oats wasn’t going to be an option. Plus, I tend to like colder things early in the morning, not warm. Is that weird?


Anyway, I have tried a few varieties over the last couple weeks and so far, I have loved them all! Took me a few tries to get my milk ratio right, I figured out I like them a little on the wet side not too thick.

But now that I have my base recipe down, the add ins are the fun part!

What you need,

For the Basic Overnight Oat recipe,

½ cup old fashioned oats (don’t use the quick oats here, they get too soggy!)

½ cup milk (I always use 1% because it is what we have in the house.)

1 heaping tablespoon of vanilla Greek yogurt (optional but I really like the added creaminess!)

1 tbsp. honey

Combine all the ingredients in a medium mason jar and stir to combine.

Now you could stop there and just eat them like that… or you can add in all the fun things!

Today I had what I think is my favorite,

Peanut Butter Banana,

Just add in one small banana sliced, 1 tablespoon of peanut butter (whatever kind you like, mine happens to be Jif!), and 1 tablespoon of mini chocolate chips, cause why not!

Stir into the base recipe and stash in the fridge!

SO SO good!

I have also tried,

Apple Raisin,

½ and apple diced, 2 tablespoons of raisins and ½ teaspoon of cinnamon.

Pumpkin Pie,

1 heaping tablespoon of pumpkin puree, ½ teaspoon raisins, ½ teaspoon pumpkin pie spice, ½ tablespoon of brown sugar.

Blueberry Banana,

1 small banana, sliced, ¼ cup blueberries (fresh or frozen), ½ teaspoon of vanilla.


All these variations have been very delicious! I have quite a few more recipes pinned to try, like Carrot Cake, Coconut Pineapple, Mixed Berry, and Cinnamon Roll…. Don’t those all sound amazing!

I find that one jar will last me for 2 breakfasts. I tend not to be a big eater in the morning, so half the jar is usually plenty. I have found that they are very filling, and they have been keeping me fuller longer in the day, which is great!

Are you guys eating Overnight Oats? If you are shout out your favorites flavors! I am dying to try many more!

Oh, and if you are wondering they keep perfectly well in the fridge for 3-4 days easily. I make mine up on Sunday and they are still totally perfect Thursday or Friday!

If you are like me and slow to the overnight oatmeal train, get on it today! You won’t regret it!

Enjoy!


Jen


Sunday, February 4, 2018

Fried Ravioli


I hear there is some BIG football game on today??? I have no interest in that kind of thing, but I do like the food that goes along with big games like these.

Wings, Pizza, Chips & Dip… and these Fried Ravioli!

They are super easy and really tasty.  A little marinara sauce for dipping and you have the perfect big game food!


What you need,

1 pkg. fresh cheese ravioli (or whatever flavor you like)
1½ cup bread crumbs

1½ tbsp. Italian seasoning

½ tsp. fresh cracked black pepper

2 large eggs beaten + 1 tbsp. water

Vegetable oil for frying

¼ cup freshly grated parmesan cheese

1 cup Marinara sauce

Heat the oil to 375 degrees over medium high heat.

Dip each of the ravioli’s in the egg mixture then into the bread crumbs to coat.

Cook the ravioli in batches in the oil for 1½ minutes per side, until brown and crisp. Transfer to a wire rack. Sprinkle the ravioli with the parmesan cheese.

Heat the marinara sauce and use it as a dip for the hot crispy ravioli’s.


I love how crispy these raviolis get and the cheese gets all melty inside! Loved them.

Hope you all have a great game day! May the team you are rooting for win. (I don’t even know who is playing??)

Enjoy!


Jen


Saturday, January 27, 2018

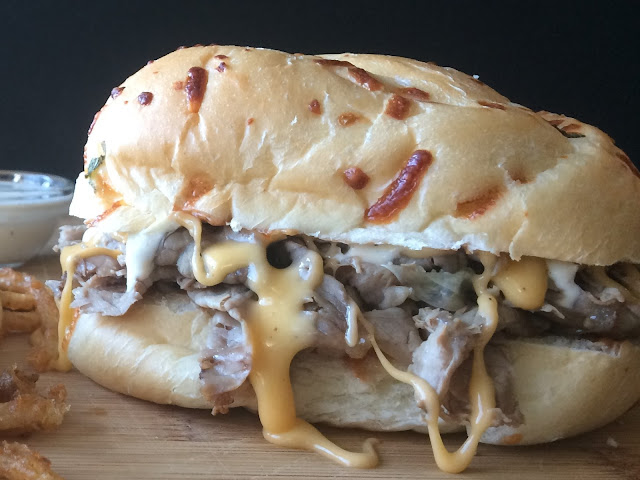
Copy Cat Arby’s Roast Beef & Cheddar Sandwiches

Last week I posted my recipe for curly fries. What better to have with curly fries than a classic Arby’s style Beef & Cheddar Sandwich.

These sandwiches turned out amazing! They tasted even better than the real thing.

They weren’t difficult to make, just a lot of sauces! Which are all very simple to whip up.

Look at all that drippy cheese… SO AMAZING!

What you need,

For the Arby’s Sauce,
½ cup ketchup
½ tsp. brown sugar
½ tsp. worcheshire sauce
½ tsp. Tabasco sauce
¼ tsp. garlic powder
¼ tsp. onion powder
½ tbsp. water

In a small bowl combine all the ingredients until well combined. Let the sauce sit covered in the fridge at least an hour, but overnight is even better to help the flavours meld.

For the Horsey Sauce
½ cup mayo
2 tbsp. sour cream
2 tbsp. white vinegar
1 tbsp. horseradish (if you like more heat you can add up more!)
½ tbsp. Dijon mustard
Pinch of salt
1 tsp. garlic powder
1 tsp. pepper

In a medium bowl stir together all the ingredients until full combined. Let the sauce sit covered in the fridge at least an hour, but overnight is even better to help the flavours meld.

For the Cheese Sauce,
¾ cup Velveeta cheese, cut into cubes
3 tbsp. milk
2 tbsp. cheese whiz
½ tsp. garlic powder
½ tsp. black pepper
In a small pot over medium low heat, stir together the Velveeta, cheese whiz, milk, garlic powder and pepper until melted and smooth.

You will also need,
4 onion rolls
300 grams of deli roast beef, sliced very thin.
You can warm the roast beef up in a covered pan over medium heat or in a bowl in the microwave for about 45 seconds, you just want it a little warm.

To assemble, cut the buns in half. Put a little Arby’s sauce on the top and bottom of each bun. Pile on some roast beef.  Drizzle on some cheese sauce and a little horsey sauce and there you have it, a perfect Arby’s Roast Beef & Cheddar Sandwich!


My mouth is watering just looking at these pictures. It may have taken an hour or so longer and probably $25 more than just hitting the drive thru, but I say it is well worth it to make your own!

I want you to know that all 3 sauces make VERY good dippers for your curly fries also!

Enjoy!

Jen


Sunday, January 21, 2018

Curly Fries


I used my spiralizer again! I am kind of obsessed. Of course, this time it had to be curly fries! 

I pulled out the deep fryer and got to work.
They were easy you just have to plan a bit in advance because the potatoes need to soak awhile in cold water.

I found an Arby’s copy cat recipe and adapted it a bit, it was very tasty, just a very light batter. Which was more of a vessel to hold on the seasonings on the fries than a real batter.

The fries were crisp and delicious!


What you need,

2 large russet potatoes, spiralized
1 ½ cup flour
3 tbsp. paprika
1 tsp. season salt
2 tsp. salt
1 tsp. pepper
1 tsp cayenne
1½ tsp. onion powder
2 tsp. garlic powder
2 cups water
3L vegetable oil for frying

After you have spiralized your potatoes soak them in large bowl of cold water in the fridge for a couple of hours. Cover the bowl with plastic wrap.
Drain the potatoes 30 minutes before frying and let them dry on a clean tea towel.
It is important that the potatoes are really dry.
In a large bowl whisk together the flour, paprika, season salt, salt, pepper, cayenne, onion powder and garlic powder. 
Heat your oil in deep fryer or large heavy bottomed pot to 375 degrees.
Dip the potatoes in the batter and then place them on a wire rack over a sheet pan to drain. You don’t want too much batter on the fries, just a nice light coating.
Let them drain for 10 minutes while your oil heats up.
When you are ready to fry, place half the fries in the pot or fryer and gently move them around with some tongs to prevent sticking. Cook for 5-6 minutes until golden and crisp. 
Drain on another wire rack over another sheet pan.  You can keep the first batch warm in a 250-degree oven while you cook the second batch of fries.


I will be making these again for sure! I want to try a baked version next time, I don’t want to have to use the deep fryer all the time! I mean it was nice, but you know!

I whipped up a copy cat Arby’s Beef & Cheddar sandwich to go with my curly fries and it was amazballs! I will share the recipe next week.

Enjoy!

Jen


Sunday, January 14, 2018

Zucchini Noodles with Tomatoes, Garlic & Basil


I finally got a spiralizer! I have wanted one for a long time but could never really justify buying one. 
But we had a Christmas dinner at work and did a dirty Santa gift exchange, and I stole this lovely little spiralizer from someone else! I love those gift exchanges!

Anyway, I got it home and couldn’t wait to try it, of course zucchini was first up.
The spiralizer worked great! It makes such a satisfying bunch of curly crunchy noodles.
I decided to do something simple with them as my first attempt. 
It turned out amazing!


What you need,

1 medium zucchini, spiralized
1 tbsp. olive oil
3 cups tiny tomatoes, halved
3 cloves garlic, minced
1 tsp. salt
½ tsp. black pepper
¼ tsp. chili flakes
¼ cup fresh basil, chopped
Parmesan cheese for serving
In a medium non-stick sauté pan heat the oil over medium heat. Cook the tomatoes until they start to soften up. Add the garlic and cook for a couple of minutes until fragrant.
Season with salt, pepper and chili flake. Smash a few of the tomatoes to get a sauce thing happening. 
Add the zucchini noodles and cook for 2-3 minutes at most! They don’t take long, and you don’t want them to be soggy.
Stir in the basil and adjust the seasoning if needed.
Top with Parmesan cheese just before serving.
That is, it, that is how easy it is. The whole process took under 20 minutes.  You can even spiralize the zucchini in advance, just put it in a zip top bag with a paper towel. It will be good like that for up to a day.


Now despite this being delicious, it is NOT pasta! It won’t ever be pasta. It is good, don’t get me wrong but it is never going to replace pasta for me. But I can see myself using the spiralizer a lot.
I want to do curly fries next for sure!
Then the possibilities are endless, sweet potato fries, beet salads, cucumber salads, carrots, butternut squash so many pretty spirals!
If you haven’t tried zucchini noodles give them a go! They really are simple and tasty and very healthy!

Enjoy!


Jen

Sunday, January 7, 2018

All the Vegetables Soup

Well here we are in the post Holiday haze. I don’t know if you are like me, but after 10 days of eating and lying around I just feel full and tired! This first week back to reality was tough.
I decided to start the week off right with a big batch of soup. Some nice healthy soup!

I knew I wanted veggies, all the veggies, I also threw in some beans for a little added protein.
The soup turned out great, so warm and hearty and totally filling, plus it has ALL the veggies!! YEAH!!

What you need,

2 tbsp. olive oil
1 28oz can chopped tomatoes, don’t drain them
2 cups cauliflower florets, cut pretty small, bite sized
1 cup green beans, cut into bite sized pieces
1 cup carrots, sliced into rounds
1 cup celery, chopped
2 cups sliced cabbage
1 small onion, diced
1 cup frozen peas 
1 cup frozen corn
1 can pinto beans, drained and rinsed (you could use chick peas if you like)
4 cloves garlic, minced
3 tsp. Italian seasoning
1 tsp. lemon pepper
1 tsp. salt
½ tsp. pepper
4 cups vegetable broth
2 cups water
¼ cup chopped fresh parsley
Parmesan Cheese for serving

In a large heavy bottomed pot heat the olive oil over medium heat. Add the cauliflower, green beans, onion, carrot, celery and cabbage, cook for 8-10 minutes until they start to soften.
Add the garlic and cook 1-2 minutes longer.
Add the Italian seasoning, lemon pepper, salt and pepper and stir to combine.
Add the tomatoes, beans, broth and water. 
Bring to a boil, then reduce the heat and simmer for 20-30 minutes until the veggies are tender. 
Stir in the peas and corn and cook for 5 minutes or so until they are heated through.
Adjust seasonings as needed.
Finish off the soup with the chopped fresh parsley.
Serve a big bowl with some freshly grated Parmesan cheese on top.
Soup perfection!

Not only is this soup healthy and delicious but it super simple to make and takes no time at all.
Also, it freezes really well, so now I have t a week worth of lunches in the freezer for later!
Oh and, feel free to use whatever veggies you like… zucchini or potato or summer squash or bell peppers, the possibilities are endless!
I hope the start of your new year has been great! Here is to another year of great food.

Enjoy!

Jen