Sunday, May 31, 2015

Mini Rustic Raspberry Tarts


The berries this spring have been amazing. The raspberries especially! They taste just like I picked them off the tree. I have eaten a ton of them.
I decided to do a little baking with them, and what better than a pretty little tart!


These rustic raspberry tarts are super simple. They look kind of fancy so they would be great for a dinner party. AND they taste amazing!


What you need,

2 cups fresh raspberries
2 tbsp. sugar
2 tsp. cornstarch

1 batch pie dough, I bought mine but if you are fancy you can make your own. You will need enough for a top and bottom crust

1 egg, lightly beaten
2 tbsp. sanding sugar

Heat the oven to 350 degrees. Line a baking sheet with parchment paper and set aside.

In a medium bowl carefully toss the raspberries with the sugar and cornstarch.

Carefully roll out the pie dough. Cut two 8 inch circles, one from each piece of pie dough and place them on the parchment paper.

I also cut 8 smaller flower shapes from the remaining pie dough. Place those on the baking sheet as well.

Pile about ¼ cup of the raspberries onto the center of each 8 inch round circle, leaving about 1 inch around the edges. Carefully fold up the edges of the pie dough all the way around. Remember this is a rustic tart so it doesn’t need to look perfect. Just make sure the berries won’t spill out

Then place 1 tbsp. of the berries onto 4 of the small pie dough shapes.
Then top each one with a second pie dough shape. Press the edges with a fork to seal them well.

Brush all the exposed dough with the beaten egg. This will help the dough get nice and brown and crisp. Sprinkle on the sanding sugar liberally. This will make the tart look pretty and well it is sugar, it will taste amazing!

Bake for 30-35 minutes until the dough is nice and golden.

Cool on a wire rack until cool.

Serve with a sprinkling of powdered sugar or a big old scoop of vanilla ice cream, either would be lovely.


These tarts were fantastic. There are only 2 of us so that is why I only made 2 of the bigger tarts. You could carefully roll the extra dough to get 2 more larger rounds instead of making the little filled tarts. I just didn’t want to waste the dough. I really loved the little tarts you can just grab them and go! Delish!


This type of tart would work well with strawberries or blackberries, even blueberries.  I can’t wait until nectarines and plums are in season, I think they would be really great too.

Enjoy!

Jen


Saturday, May 23, 2015

4 Perfect Chocolate Chip Cookies


So I was home by myself the other day, watching Harry Potter and the Philosopher’s Stone for the 67th time when I had a mad craving for a warm gooey chocolate chip cookie.


I didn’t have any cookies on hand but I quickly remembered that I had pulled a recipe out of a recent Canadian Living Magazine for a small batch of Chocolate Chip cookies.

I dug through a huge pile of papers until I finally found it, then I immediately whipped up a batch.


Man, these cookies are perfect‼ Firstly they are so simple and fast, you can have cookies in less than 20 minutes!
They are so buttery and soft, chewy in the center with crispy edges and filled with melty chocolate… YUM!

What you need,

2 tbsp. butter (I used salted like I always do)
¼ cup packed brown sugar
1 large egg yolk
½ tsp. vanilla
1/3 cup all-purpose flour
¼ tsp. baking soda
¼ cup semi-sweet chocolate chips

Heat the oven to 350 degrees. Line a baking sheet with parchment paper.

In a medium bowl cream the butter and sugar together until light and fluffy. Add the egg yolk and beat well. Stir in the vanilla. 
Add the flour and baking soda and stir until well combined.
Stir in the chocolate chips.

Divide the dough into 4 portions and roll gently into balls. Place them on the parchment paper and press lightly just to flatten a little bit.

Bake for 10-12 minutes, or until the cookies are lightly browned around the edges but the middle is still a bit soft looking.

Remove the cookies from the oven and let them cool on the pan for 4-5 minutes. Transfer the cookies to a wire rack to cool completely.

Eat 1 or all 4 at your leisure.


Now the best part of this cookie recipe is that it only makes 4 cookies, big cookies but still, only 4.

I don’t know about you, but if I make a batch of cookies I tend to eat that whole batch of cookies in fairly short order. Not such a good idea headed into bathing suit season.

But when you only have 4 cookies and you feel a little guilty knowing your in house taste tester is coming home soon and you know he too loves chocolate chip cookies, you only eat 2 of those perfect cookies. Your bathing suit will be happy about that!

I do fear that I may make these WAY too often, but at least I can justify it in my mind knowing it is only a couple of cookies, it can’t be that bad, right??

Enjoy!

Jen

Recipe adapted slightly from Canadian Living Magazine

Sunday, May 17, 2015

Skillet Breakfast with Hashbrowns, Bacon & Fried Eggs


This is officially my new favourite breakfast. I could eat it every single day.
This skillet is the perfect combination of everything I love about breakfast. Crispy hashbrowns, perfectly crisp bacon and runny fried eggs!


Add a couple slices of toasted rye bread and some fresh berries and you will have a breakfast better than you can get at any greasy diner!


What you need,
For 2 servings

2 tbsp. Vegetable oil
1 tbsp. butter
3-4 cups frozen hashbrowns
3 green onions, chopped
½ green pepper, diced
½ red pepper diced
4-5 button mushrooms, diced
½ cup grated cheddar cheese
6 slices of bacon
Salt and Pepper to taste
2-4 eggs, fried
4 slices perfectly crisp bacon

In a large skillet heat the vegetable oil and butter over medium high heat.  Add the hashbrowns and press into a single layer. Leave them for 4-5 minutes until they start to get brown and crisp. Flip the hashbrowns over and cook another 4-5 minutes until golden and crisp.  Season well with salt and pepper.
Add the chopped onion, bell peppers and mushrooms. Stir into the hashbrowns and continue to cook until the veggies are softened and everything is browned and crisp.

Cook your bacon, now you could do this in the pan before you start the hashbrowns and remove it to a plate while the hashbrowns cook but I prefer to cook my bacon in the oven! Heat the oven to 400 degrees. Line a baking sheet with tin foil and spray lightly with non-stick spray. Lay out the slices of bacon in a single layer. Cook for 12-15 minutes until the bacon is brown and crisp‼
Remove the bacon from the oven carefully; don’t splash the hot grease on your arm‼ I did that once, it wasn’t fun.  Drain the bacon on a paper towel.
Cut the bacon into bite sized pieces and add it to the hashbrown mixture.

Sprinkle the cheese on top of the hashbrowns and lower the heat until the cheese melts.

In a separate pan fry your eggs in some butter, cause it makes them taste even yummier‼

Slide the eggs onto the top of the hash browns and serve!


What can I say except fabulous! 
Seriously, best breakfast EVER‼

Enjoy!

Jen


Sunday, May 10, 2015

Vietnamese Noodle Bowls with Grilled Lemongrass Chicken


Whenever I am visiting my sister we always order these amazing Vietnamese Noodle Bowls from this little hole in the wall place near her house. I LOVE them! I dream about them when I am not there, I haven’t been able to find a place near me that makes them quite the same. 


I was really craving one so I decided to try and make them on my own. I searched the internets for the components that I knew I would need to make them just right. I kinda mashed them all together and came up with a fantastic recipe.


These bowls are just fantastic. They are so close the ones that inspired me to make them. They totally satisfied my craving!


What you need,

For the noodle bowl,
½ pkg. rice vermicelli noodles
3 cups romaine lettuce, sliced thinly
1 English cucumber, julienned
1 large carrot, julienned
2 cups bean sprouts
6-7 basil leaves, torn into small pieces
2 green onions, sliced thinly
1 small red chili, sliced thinly
½ cup peanuts, chopped
6 Vietnamese style spring rolls (store bought is fine!)

For the Nuc Mam Sauce,
1 cup water
4 tbsp. rice wine vinegar
2 tbsp. sugar
5 tbsp. fish sauce
2 cloves garlic minced
1 small red chili, sliced thinly
1 tbsp. lime juice

For the grilled lemongrass chicken,
2 chicken breasts, trimmed of any fat
1 lemon grass stalk, cut into ¼ inch pieces
1 inch piece of ginger, grated
2 cloves garlic, minced
2 green onions, sliced
1 tbsp. honey
1 tbsp. lime juice
2 tsp. fish sauce
2 tsp. soy sauce
2 tsp. vegetable oil
¼ tsp. fresh cracked black pepper
3 tbsp. water

Start by making the Nuc Mam sauce. In a small pot over medium heat combine the water, sugar and rice wine vinegar.  Bring the mixture to a boil then remove it from the heat and let it come to room temperature.  Once the mixture has cooled stir in the fish sauce, garlic, chili and lime juice. Cover the sauce and keep in the fridge until you are ready to use.  This can easily be made up to 2 days ahead.

Next up make the marinade for the chicken.  In a large zip top bag combine the lemongrass, ginger, garlic, onions, honey, lime juice, fish sauce, soy sauce, vegetable oil, pepper and water. Shake it well to combine. Toss in the chicken breasts and massage the marinade in well. Let the chicken marinate in the fridge for at least 2 hours and up to overnight.

When you are ready to eat cook the rice vermicelli noodles according to the package directions then bake the spring rolls, according to directions on the package and finally grill the chicken on the BBQ or in a grill pan until brown and crisp and cooked through.

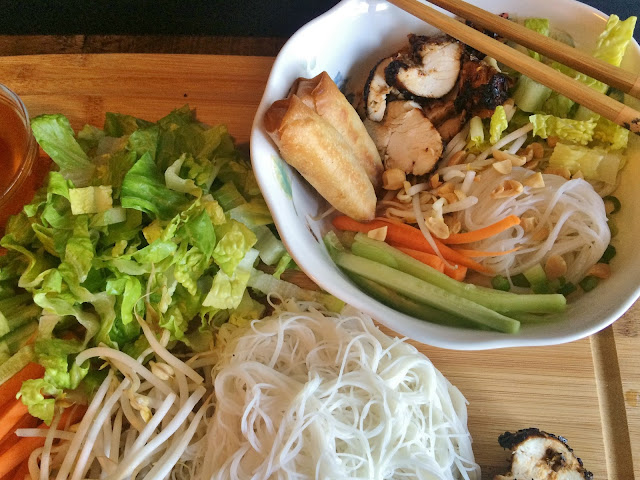
When you are ready to assemble the noodle bowls I find it easiest to lay out all the ingredients on a large cutting board, or you could use small bowls for each ingredient if you want. This way everyone can take what they want and add it to their own bowls.

Lay out the cooked noodles, slice the chicken and slice the spring rolls into 1 inch pieces.  Place the lettuce, cucumber, bean sprouts, carrot, basil, green onion, red chili and chopped peanuts on the board or in bowls.

Once you have dished up your bowl pour a generous helping of the Nuc Man sauce over the bowl, and stuff it in your face!


These noodle bowls were to die for! The chicken, OMG it was so good. I have never had grilled chicken with so much flavor!

They do take a little time to prepare, but all the steps are simple and most if it can be prepped well in advance.
They would make a great dinner party food. The recipe makes a lot of food and everyone can choose what they want in their bowls.

Now that I know I can make these at home, I may never eat out again‼

Enjoy!


Jen


Recipe frankensteined together from a whole bunch of recipes on the interwebs.