Saturday, December 30, 2017

5 Of My Favorites From 2017!

I can't believe that 2017 is almost over... Seriously fastest year ever.
I think I say that every year, but I feel like it is true, each year seems to go faster and faster.

I didn't blog as much this past year, I don't really know why I just felt like I needed a bit of a bloggy break.  I do plan on a lot more recipes for 2018! I already have a bunch of recipes on my "To Make" list.

Here are 5 of my favourite recipes from this past year, in no particular order.  I have made these recipes multiple times this year, that is how good they are.


This soup is so simple and so tasty. The best part is ,it freezes so well!! I have made multiple batches this year and frozen them in individual containers for quick work lunches! I give this recipe 2 or even 3 thumbs up!


I do love me a muffin or quick bread. I think I have over 30 on the blog!! These super cute little loaves are a delight. They are moist and tender and full of blueberry goodness!


If you can get your hands on some fresh salmon, I do hope you will make these amazing Salmon Cakes. They are so crisp and delicious! The sauce is killer as well!


I often have a strong need for a piece of chocolate cake. This is the perfect cake for that craving. All the ingredients are things you are sure to have on hand and it cooks up quick and perfect. It is moist and tender and so chocolaty! I love it!!


This was my go to summer recipe. I made it or some variation of it at least once a week. I love that you can use different veggies and sausage and spices each time. I also love that you can prep the packs in advance, always a win for weeknight meals. They taste amazing and they really are the perfect summer meal!

What were your favorite recipes this year? Any best by requests for recipes for 2018?
Love you guys! Thanks so much for taking time to ready my tiny little blog! It means a lot to me!

I wish you all health, happiness and laughter for 2018!!

Jen


Sunday, December 24, 2017

Merry Christmas!

Wishing all of you a very Merry Christmas!
May your holiday be filled with lots of love, laughter and a little magic!


Jen

Monday, December 18, 2017

Eggnog Cranberry Cheesecake Squares


How is it a week until Christmas?? How?? Seriously this month has flown by. I thought at the end of November that I was on track to have a chaos free December. I had timeline to get all the things done, then suddenly it was December 17th and I was like WHAT???


Oh well, ready or not here come Christmas! At least I have these delightful little Cheesecake squares to make it all better!

They are super simple and beyond delicious!


What you need,

For the crust,

2 cups graham cracker crumbs

¼ cup granulated sugar

½ tsp. ground nutmeg

4 tbsp. melted butter


For the batter,

2 blocks of cream cheese, softened to room temperature

¾ cups granulated sugar

¾ cup eggnog

2 large eggs

1 tsp. vanilla

½ tsp. ground nutmeg

½ tsp. ground cinnamon

½ tsp. salt

1 ½ tbsp. all purpose flour

1 cup cranberry sauce, this is the recipe I always use but you can use whatever kind you like.


Heat the oven to 350 degrees.  Line a 9x13 inch pan with parchment paper and spray liberally with non-stick spray.

In a bowl stir together the graham crumbs, sugar, nutmeg and butter.  Press the crumbs into the prepared pan.

Bake for 8-10 minutes until just starting to get golden brown.

Meanwhile in a bowl beat the cream cheese until light and fluffy. Add in the eggnog and the eggs and mix until well combined. Add the vanilla, nutmeg, cinnamon, salt and flour, stir well.

Pour the batter onto the prepared crust.  Dollop the cranberry sauce over the surface and swirl with a knife gently into the batter.

Bake in the centre of the oven for 40-45 minutes until it is set. Let the cake cool completely on a rack then refrigerate for a couple hours until fully chilled.

Carefully remove the cheesecake from the pan and cut into squares. You can store the squares in an airtight container in the fridge or they freeze well too!


If you are thinking you need one more treat to add to your cookie platter I really think you should make these. They are incredibly tasty!  They have all the flavors of the holidays and are just a joy to eat!

I hope you all have a very Happy Holiday! I know I have been a little light on the blog this year… but I have bigger goals for 2018.

Enjoy!


Jen


Saturday, December 9, 2017

Soft & Cakey Christmas Sugar Cookies

I can’t believe we are are like 2 weeks from Christmas Day… HOW is that possible. Man, this month is flying by. I have done a little baking, tarts, ginger crinkles and these cuties!


These festive sugar cookies are just a delight. They are soft and cakey and delicious!

They are totally different than my old-time sugar cookie recipe which was nice for a change of pace.

I found them easier to decorate too since they were just round. But they are just as cute I think!


What you need,

½ cup butter

½ cup sour cream

1¼ + 2 tbsp. granulated sugar

1 egg

1 tsp. vanilla

¼ tsp. almond extract

3 cup all purpose flour

¾ tsp. baking powder

½ tsp. baking soda

Pinch of salt


For the icing,

½ cup butter

½ tsp. vanilla

¼ tsp. almond extract

2 cup icing sugar

2 tbsp. milk

Food coloring and Sprinkles!


Heat the oven to 375 degrees. Line a baking sheet with parchment or a Silpat mat and set aside.

In a large bowl beat together the butter, sour cream and sugar until light and fluffy. Beat in the egg until fully incorporated. Add the vanilla and almond extract and stir to combine.

Mix in the flour, baking powder, baking soda and salt until fully mixed in.

Scoop the cookies by the heaping tablespoon and roll into balls. Use the bottom of a flat glass dipped in flour to press the cookies flat to about 1 inch thick.

Bake for 10-11 minutes or until just set around the edges. Let the cookies cool on the pan for 5 minutes then cool completely on a wire rack.

Once the cookies are cooled you put the icing on them.

Beat the butter and vanilla and almond extract together. Mix in the icing sugar. Add the milk a little at a time until you get a nice smooth icing. Add food coloring to your preference and sprinkle with holiday fun!


What are all of you making for the holidays?? I still have Almond Bark to make and I have one more new recipe I am gonna try and if it turns out I will post it before Christmas! Here is hoping it is success. It sure sounds good, it has cranberries in it!!


Enjoy!


Jen


Sunday, November 26, 2017

Mini Banana Muffins with Chocolate Chips or Reese’s Pieces or BOTH!


How in the world is it a month until Christmas??? Wasn’t it just July?

Man, time sure seems to be going faster and faster the last couple years.

But on a high note I made you muffins! They are tiny and cute and totally delicious!


They would make a great Christmas morning snack, they are so small you can just pop them in your mouth and keep opening presents!


What you need,

¼ cup butter

½ cup granulated sugar

1 egg

½ cup mashed banana

2 ½ tbsp. buttermilk

½ tsp. vanilla

1 cup flour

¾ tsp. baking powder

¾ tsp baking soda

1 cup mini chocolate chips, or mini Reese’s Pieces or ½ cup of each!

Heat the oven to 350 degrees. Spray a mini muffin tin with non-stick spray or you could use cute mini paper liners!

In a bowl cream together, the butter and sugar. Add the egg and combine well. Stir in the banana, buttermilk and vanilla.

Add the flour, baking powder and baking soda and fold to combine. Don’t over mix here, you don’t want tough muffins.

One final fold in of the mini chips and that is the batter.

Scoop into the prepared pan and bake 12-15 minutes, until golden brown and a toothpick comes out clean.

Transfer the muffins to a wire rack to cool completely.

Store in an airtight container for 3 days or you can freeze them for later.


These little muffins are a delight! They are so tasty, and the tiny bit of peanut butter you get from the Reese’s Pieces is a real treat!

I do have a couple holiday recipes coming up in the next couple weeks for you. I sure do love this time of year.

I so wish I could just stay home and bake and watch Christmas movies all day but sadly, work…


Have a great week!


Enjoy.


Jen

Saturday, September 30, 2017

Baked Tomato, Mushroom & Spinach Tortellini

Herb and cheese filled tender tortellini slathered in a rich tomato sauce with sautéed mushrooms and spinach baked with cheese, what more do I need to tell you about this amazing dish?

It really speaks for itself, just look at it! It is a thing of beauty.


I will eat pasta all day everyday, but bake it with some cheese and well it takes it to a whole new level.

This dish came together super fast. I quickly sauteed the mushrooms and spinach while the pasta was cooking, added the pasta and the sauce to the sauteed veggies added a few spices and that was that.

Just pour the whole mess into a baking dish and throw some grated cheese on top. Bake for about 25 minutes and you too can have this amazing cheesy pasta!


What you need,

1 pkg. fresh tortellini, I used Herb & Cheese but you use whatever flavor you like

1 jar of your favorite tomato based pasta sauce, I used Classico Tomato with Basil

¼ cup milk (I used 1%)

2 tbsp. butter

2 cups button mushrooms, sliced

4 cups fresh baby spinach leaves

½ tsp. garlic powder

1 tsp. sugar

1 tsp. salt

½ tsp. pepper

2 cups grated cheese, I used a combo of cheddar and mozzarella


Heat the oven to 350 degrees.

Cook the Pasta according to package directions, less 2 minutes, drain and set aside. They pasta will cook a little more in the oven so under cook it a little so it doesn’t get too overcooked.

In a large non-stick pan, melt the butter over medium high heat. Add the sliced mushrooms to the pan and cook for 4-5 minutes until softened and starting to brown. Add the spinach and sauté until wilted. Season with the salt and pepper and garlic powder.  Add the tomato sauce, milk and sugar to the pan and stir to combine.  Add the cooked pasta and stir to coat. Season with additional salt and pepper if needed.

Pour the pasta into a baking dish, sprinkle it with the cheese and bake in the oven for 25 minutes. I like to broil the pasta for a few minutes at the end just to brown up the cheese!


Ok people, there you have it, a wonderful hearty pasta dish you and your whole family will love!

Add a nice Cesar salad on the side and you win at dinner!


Enjoy!


Jen


Sunday, September 24, 2017

Oatmeal Krispie Chocolate Chip Cookies


Sometimes you just need a cookie… or like 3!


These Oatmeal Krispie Chocolate Chip Cookies are just what you need.

They are nice and crisp on the edges and super chewy in the middle, which I love.
The addition of rice krispies really adds a nice texture!


What you need,

1 ½ cups butter (I used salted cause I always do!)

1 cup brown sugar

1 cup white sugar

2 large eggs

1 tsp. vanilla

1 tsp. baking powder

1 tsp. baking soda

1 tsp. salt (I only used ½ a tsp. because I used salted butter!)

2 cups all purpose flour

2 cups quick oats

2 cup rice Krispie cereal

2 cups chocolate chips

Heat the oven to 350 degrees and line a baking sheet with parchment or a silpat mat.

In a large bowl beat the butter and both sugars together until light and fluffy. Add the eggs one a time and beat until well incorporated.

Stir in the vanilla.

In a separate bowl whisk together the baking powder, baking soda, salt and flour.

Stir the flour mixture into the butter mixture until combined. Add the oats and cereal and mix well. Fold in the chocolate chips.

Drop the batter by the heaping tablespoon onto the prepared baking sheets. Bake 9-10 minutes until golden around the edges but still soft in the middle.

Cool on the pan for 3-4 minutes before transferring to a wire rack to cool completely.


You can stash the cooled cookies in an airtight container for about 3 days, not like they will last that long! Or you could freeze them 2 per little zip lock bag and save them to toss in school and work lunches. I know a little pack of these cookies would brighten my day!

What else can I say… MMMMM Cookies! Really really good cookies!


Enjoy!


Jen

Sunday, September 17, 2017

Nectarine Oatmeal Muffin


Wow, I have been a very bad blogger lately. But it was summer and I had sunshine to enjoy!


Today it is feeling very fall-esque! Which isn’t a bad thing, I am looking forward to warm sweaters and big bowls of soup!


For me Fall equals muffins, all kinds of muffins! I wanted to use up the last of the summer fruit, some juicy sweet nectarines and pair them with some warm fall spices, cinnamon, nutmeg and ginger.


What you need,
Click Here To Print


2 cups all purpose flour

¾ cup granulated sugar

½ tsp. salt

1 tsp. baking powder

½ tsp. baking soda

1 tsp. ground cinnamon

½ tsp. ground nutmeg

½ tsp. ground ginger

1 cup quick oats

3 nectarines peeled and diced pretty small

2 large eggs

1 cup milk (I used 1%)

1 tsp. vanilla extract

¼ cup vegetable oil

Heat your oven to 350 degrees. Line 2 muffin tins with paper liners. (I got 20 muffins)

In a large bowl whisk together the flour, sugar, salt, baking powder, baking soda, cinnamon, nutmeg, ginger and oats.

In a separate bowl whisk the eggs, milk, vanilla and vegetable oil. 

Gently fold the wet ingredients into the dry until just combined. Then add the diced nectarine and fold to combine.


Scoop the batter evenly into the muffin papers. Sprinkle the tops with a little coarse sugar if you like, I did!

Bake for 15-18 minutes until golden brown and a toothpick comes out clean.


Let the muffins cool on a wire rack completely before packing them up.

I like to wrap the muffins individually in saran wrap then put them in a large zip top bag and stash them in the freezer for lunches or snacks later on!


These muffins are beyond amazing. Nice and moist with such great warm fall flavors.

Happy Fall everyone.


Enjoy!!


Jen


Sunday, August 6, 2017

Twice Baked Broccoli Cheddar Potatoes


I have been trying to make one or 2 meatless meals a week lately. Not for any health reasons just because I am kind of tired of meat!


I decided to whip up some twice baked potatoes and thought hey why not toss some cheese and broccoli in there, so I did.


Man, these potatoes, they are amazing. So crisp and creamy and full of flavor. They were really filling and a nice mixed green salad paired perfectly with them.

There is only the 2 of us so I just made one large, I mean BIG potato, but if you have a family just double or triple the recipe!


What you need,

1 large russet potato, washed and dried

1 tbsp. olive oil

½ tsp kosher salt

2 tbsp. milk or cream

2 heaping tbsp. sour cream

1 tbsp. butter

¼ cup grated cheddar cheese + a little extra for topping

½ cup or broccoli chopped into very small florets

Salt and Pepper to taste

Poke holes all over your potato, then microwave it on high for 3-5 minutes until it starts to soften.  Then rub it in olive oil and sprinkle it all over with salt and place it on a baking sheet. Bake at 400 degrees until the skin is crisp and the potato is fully cooked through, 30-45 minutes. I rolled my potato over halfway through.

Remove the potato from the oven and let it cool until you can handle it.  Cut in half lengthwise. Carefully scoop out the middles leaving a little potato around the edge to hold the filling in when you re-stuff it.

Mash the inside of the potato with the milk, sour cream and butter. Stir in the cheese and broccoli and season to your taste with salt and pepper. Try not to eat all the filling with a spoon, I almost did, damn it was tasty!

Re-stuff the potatoes with the filling, heaping it in there. Top with a little extra cheese and bake at 400 degrees for 20-25 minutes until it is hot and melty.

Stuff in your face… well maybe make a salad and have that too…


These potatoes, what can I say, just look at them, they are a thing of beauty.

They taste like a dream.

You won’t miss the meat in this meal at all! I promise!


Enjoy!


Jen


Saturday, July 22, 2017

Grilled Sausage & Veggies Packs

In my quest to make decent dinners without turning on the oven I whipped up these totally delicious, super simple tinfoil packs. They are full of smoked sausage and lots of veggies. You can prep them the day before and then all you have to do is toss them on the BBQ for 20-25 minutes and you have a complete meal, no fuss no muss!


And feel free to use whatever veggies you like I think the possibilities are endless here!


What you need,

1 lb. pre-cooked sausage, cut into 1-inch rounds

(I used Harvest Smoked Summer Sausage but you can use whatever you like, chicken or turkey would be awesome!)

1 ear corn, cut into 1-inch rounds

1 red or orange bell pepper, cut into 1-inch pieces

6 button mushrooms, halved or quartered depending on how big they are

1 small zucchini cut into 1-inch rounds

2 medium potatoes cut into ½ inch pieces

2 tbsp. olive oil

2 tbsp. butter

1 tsp. season salt

½ tsp. black pepper

1 tsp. dried basil

½ tsp. granulated garlic

½ tsp. granulated onion


In a large bowl combine all the veggies and sausage. Drizzle with the oil and spices and toss well to coat.

Using a double layer of tinfoil divide the mixture into 4 packs. Dollop ½ tablespoon of butter over each pack. Close each pack tightly. Try to make them pretty flat.

I stashed mine in the fridge overnight and cooked them the next day for dinner…

Heat your grill to medium.  Cook the packs for 10 minutes then flip and cook for another 10 minutes. I flipped mine a final time for 5 more minutes. Remove them from the grill and carefully open each up, watch that steam, it is HOT!

I emptied all the pack onto a platter and served them that way, but you could serve each person their own pack.

I served mine with a little sour cream and a little mustard.


This is going to be a weekly summer dinner in my house. We ate it all up! I thought for sure there would be left overs but nope, we scarfed it all down!

There was so much flavour the veggies were perfectly tender and the sausage got a little crisp.

Absolutely fabulous! And I didn’t have to use the oven! WhooHoo!


Enjoy!


Jen 


Sunday, July 9, 2017

Tortellini Pasta Salad

SUMMER!! WHOO HOOO!!! Man, it has been so great here the last month or so. So sunny and warm. I do love me some summer. Sadly, cooking dinner in the summer is my nemesis… turning on the oven in the summer is a no go, we don’t have air conditioning and it just gets TOO hot in here.

I have been trying to do more cold dinners lately. That pretty much limits us to salad, which is fine, I love salad but sometimes you just want something new and exciting

This Tortellini Pasta Salad is just the thing! I made this Italian version the other day, it was a delight.

Super easy, super flavorful and no oven!


What you need,

1 pkg. Tri-Colored Cheese Tortellini (I used the fresh stuff from the fridge section of the grocery store)

2 cups broccoli, cut into small florets

1 cup asparagus, cut into 1 inch pieces

1 cup cucumber, chopped

1 cup small tomatoes, halved

1 cup mini sweet peppers, sliced into rings

1 cup green olives (or whatever olives you like)

1 cup House Italian Dressing (I used Kraft, but whatever kind you like!)

Parmesan Cheese for garnish


Cook the tortellini according to package directions. Add the broccoli and asparagus in the last 2 minutes of cooking. Drain the pasta and veggies and run under cool water for a minute or so.

Drain really well so the pasta isn’t wet. Place the pasta and veggies into a bowl and drizzle with ½ the dressing. 

Put the bowl in the fridge for an hour or so until the pasta is chilled. Add the cucumber, tomatoes, peppers and olives. Add the rest of the dressing and some salt and pepper if you want. Stir really well to combine.

Let the salad sit in the fridge another ½ hour or so to let the flavours meld.

Garnish with a little Parmesan cheese before serving if you want! I don’t know why you wouldn’t want to, but you do what you like!


There you have it, a simple and delicious summer pasta salad. It is filling and makes GREAT left overs!

I also made a caprese version the week before, I just forgot to take pictures. It had little tomatoes, pearl bocconcini cheese, basil and spinach. I used a balsamic vinaigrette. I had a little grilled chicken left over from dinner the night before so we tossed a little of that on top as well.  This version was great as well. 

I feel like the possibilities are endless…A Greek version, a Southwest version you get the idea! Use what you have I promise it will be delicious!


Enjoy!


Jen

Sunday, June 11, 2017

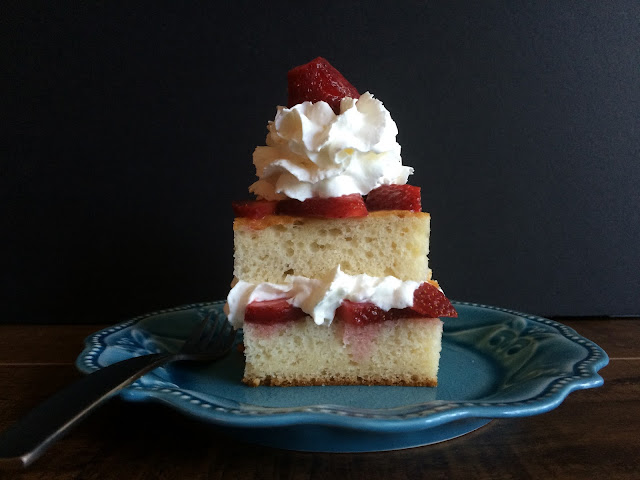
Super Simple Strawberry Shortcake


We have been eating a lot of berries the last couple weeks. They strawberries have been especially tasty lately. I bought a big flat the other day and knew I was going to have to make something to use some of them up.


I decided Strawberry Shortcake would be the perfect treat.  I decided to cheat a little and use a cake mix. If you want to make your own cake, good for you! I also used whipped cream from a can, cause that is how I roll!

Despite my cheats it tasted delicious!


What you need,

1 Yellow Cake (I used a French Vanilla boxed cake and made it according to the directions on the box)

3 cups strawberries, sliced

1 tbsp. sugar

Whipped Cream


In a bowl stir the strawberries with the sugar and let them sit at least an hour before making the shortcakes.

When you are ready cut yourself a nice sized piece of cake and slice it in half, horizontally.

Add a layer of sliced berries onto the bottom layer of cake, top with whipped cream, add the top layer of cake, add more berries and more whipped cream until you have a tower of awesomeness!


Stuff in your face!

There you have it, super simple, super tasty! This would be a great dessert for a crowd. Or just for you and your sweetie! We ate strawberry shortcake 4 nights in a row and it was delightful!

Enjoy!


Jen


Sunday, May 21, 2017

Kraft vs. Jif - A Cookie Comparison

I have been a Kraft Peanut Butter girl for my whole life. I never cared to eat any other peanut butter… ever!


They recently started selling Jif Peanut Butter in Canada. I wasn’t particularly interested in this fact but my in-house taste tester was. He immediately wanted to try it. I reluctantly agreed…

We came home from the store and immediate opened the Jif, and my trusty jar of Kraft. We each grabbed a spoon and gave them a taste. I tried the Kraft first and was like yep, Kraft, it is the best. Then I tried the Jif, it was good. It was really good. I had to have a couple tastes, but it is really creamy, and it has a deeper roasted peanut flavour than the Kraft.


We did the toast taste test the next morning and we both blind tested the Jif as our favourite.

So, there was only one test left… Peanut Butter Cookies!

This is my all time favourite cookie recipe. I have been making it forever. It is always a winner.

I made one batch using Kraft and one batch using Jif.

I make them side by side, at the same time. I baked them alternating pans between the 2 kinds. Cooled them on separate racks and waited for my in-house taste tester to get home so we could get down to business.


So, I ate 10 or 12 cookies in the name of science of course! Again Jif came out on top, for both of us.


The Jif cookies were a little puffier, and the centre was a bit denser which created a slightly chewier cookie. My favourite cookie trait is its chewiness!

The taste was similar but the Jif does really have a stronger peanut taste.

So, after all this I may be converted… After all these years of being a Kraft girl I think I just may be making the switch to Jif. Who woulda thunk it!

What is your favourite peanut butter?

Whichever it is, make these cookies they are truly the best cookie ever!


Enjoy!


Jen