Saturday, January 27, 2018

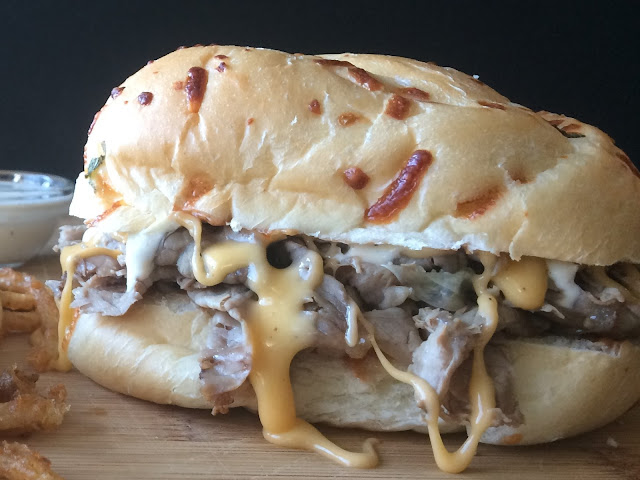
Copy Cat Arby’s Roast Beef & Cheddar Sandwiches

Last week I posted my recipe for curly fries. What better to have with curly fries than a classic Arby’s style Beef & Cheddar Sandwich.

These sandwiches turned out amazing! They tasted even better than the real thing.

They weren’t difficult to make, just a lot of sauces! Which are all very simple to whip up.

Look at all that drippy cheese… SO AMAZING!

What you need,

For the Arby’s Sauce,
½ cup ketchup
½ tsp. brown sugar
½ tsp. worcheshire sauce
½ tsp. Tabasco sauce
¼ tsp. garlic powder
¼ tsp. onion powder
½ tbsp. water

In a small bowl combine all the ingredients until well combined. Let the sauce sit covered in the fridge at least an hour, but overnight is even better to help the flavours meld.

For the Horsey Sauce
½ cup mayo
2 tbsp. sour cream
2 tbsp. white vinegar
1 tbsp. horseradish (if you like more heat you can add up more!)
½ tbsp. Dijon mustard
Pinch of salt
1 tsp. garlic powder
1 tsp. pepper

In a medium bowl stir together all the ingredients until full combined. Let the sauce sit covered in the fridge at least an hour, but overnight is even better to help the flavours meld.

For the Cheese Sauce,
¾ cup Velveeta cheese, cut into cubes
3 tbsp. milk
2 tbsp. cheese whiz
½ tsp. garlic powder
½ tsp. black pepper
In a small pot over medium low heat, stir together the Velveeta, cheese whiz, milk, garlic powder and pepper until melted and smooth.

You will also need,
4 onion rolls
300 grams of deli roast beef, sliced very thin.
You can warm the roast beef up in a covered pan over medium heat or in a bowl in the microwave for about 45 seconds, you just want it a little warm.

To assemble, cut the buns in half. Put a little Arby’s sauce on the top and bottom of each bun. Pile on some roast beef.  Drizzle on some cheese sauce and a little horsey sauce and there you have it, a perfect Arby’s Roast Beef & Cheddar Sandwich!


My mouth is watering just looking at these pictures. It may have taken an hour or so longer and probably $25 more than just hitting the drive thru, but I say it is well worth it to make your own!

I want you to know that all 3 sauces make VERY good dippers for your curly fries also!

Enjoy!

Jen


Sunday, January 21, 2018

Curly Fries


I used my spiralizer again! I am kind of obsessed. Of course, this time it had to be curly fries! 

I pulled out the deep fryer and got to work.
They were easy you just have to plan a bit in advance because the potatoes need to soak awhile in cold water.

I found an Arby’s copy cat recipe and adapted it a bit, it was very tasty, just a very light batter. Which was more of a vessel to hold on the seasonings on the fries than a real batter.

The fries were crisp and delicious!


What you need,

2 large russet potatoes, spiralized
1 ½ cup flour
3 tbsp. paprika
1 tsp. season salt
2 tsp. salt
1 tsp. pepper
1 tsp cayenne
1½ tsp. onion powder
2 tsp. garlic powder
2 cups water
3L vegetable oil for frying

After you have spiralized your potatoes soak them in large bowl of cold water in the fridge for a couple of hours. Cover the bowl with plastic wrap.
Drain the potatoes 30 minutes before frying and let them dry on a clean tea towel.
It is important that the potatoes are really dry.
In a large bowl whisk together the flour, paprika, season salt, salt, pepper, cayenne, onion powder and garlic powder. 
Heat your oil in deep fryer or large heavy bottomed pot to 375 degrees.
Dip the potatoes in the batter and then place them on a wire rack over a sheet pan to drain. You don’t want too much batter on the fries, just a nice light coating.
Let them drain for 10 minutes while your oil heats up.
When you are ready to fry, place half the fries in the pot or fryer and gently move them around with some tongs to prevent sticking. Cook for 5-6 minutes until golden and crisp. 
Drain on another wire rack over another sheet pan.  You can keep the first batch warm in a 250-degree oven while you cook the second batch of fries.


I will be making these again for sure! I want to try a baked version next time, I don’t want to have to use the deep fryer all the time! I mean it was nice, but you know!

I whipped up a copy cat Arby’s Beef & Cheddar sandwich to go with my curly fries and it was amazballs! I will share the recipe next week.

Enjoy!

Jen


Sunday, January 14, 2018

Zucchini Noodles with Tomatoes, Garlic & Basil


I finally got a spiralizer! I have wanted one for a long time but could never really justify buying one. 
But we had a Christmas dinner at work and did a dirty Santa gift exchange, and I stole this lovely little spiralizer from someone else! I love those gift exchanges!

Anyway, I got it home and couldn’t wait to try it, of course zucchini was first up.
The spiralizer worked great! It makes such a satisfying bunch of curly crunchy noodles.
I decided to do something simple with them as my first attempt. 
It turned out amazing!


What you need,

1 medium zucchini, spiralized
1 tbsp. olive oil
3 cups tiny tomatoes, halved
3 cloves garlic, minced
1 tsp. salt
½ tsp. black pepper
¼ tsp. chili flakes
¼ cup fresh basil, chopped
Parmesan cheese for serving
In a medium non-stick sauté pan heat the oil over medium heat. Cook the tomatoes until they start to soften up. Add the garlic and cook for a couple of minutes until fragrant.
Season with salt, pepper and chili flake. Smash a few of the tomatoes to get a sauce thing happening. 
Add the zucchini noodles and cook for 2-3 minutes at most! They don’t take long, and you don’t want them to be soggy.
Stir in the basil and adjust the seasoning if needed.
Top with Parmesan cheese just before serving.
That is, it, that is how easy it is. The whole process took under 20 minutes.  You can even spiralize the zucchini in advance, just put it in a zip top bag with a paper towel. It will be good like that for up to a day.


Now despite this being delicious, it is NOT pasta! It won’t ever be pasta. It is good, don’t get me wrong but it is never going to replace pasta for me. But I can see myself using the spiralizer a lot.
I want to do curly fries next for sure!
Then the possibilities are endless, sweet potato fries, beet salads, cucumber salads, carrots, butternut squash so many pretty spirals!
If you haven’t tried zucchini noodles give them a go! They really are simple and tasty and very healthy!

Enjoy!


Jen

Sunday, January 7, 2018

All the Vegetables Soup

Well here we are in the post Holiday haze. I don’t know if you are like me, but after 10 days of eating and lying around I just feel full and tired! This first week back to reality was tough.
I decided to start the week off right with a big batch of soup. Some nice healthy soup!

I knew I wanted veggies, all the veggies, I also threw in some beans for a little added protein.
The soup turned out great, so warm and hearty and totally filling, plus it has ALL the veggies!! YEAH!!

What you need,

2 tbsp. olive oil
1 28oz can chopped tomatoes, don’t drain them
2 cups cauliflower florets, cut pretty small, bite sized
1 cup green beans, cut into bite sized pieces
1 cup carrots, sliced into rounds
1 cup celery, chopped
2 cups sliced cabbage
1 small onion, diced
1 cup frozen peas 
1 cup frozen corn
1 can pinto beans, drained and rinsed (you could use chick peas if you like)
4 cloves garlic, minced
3 tsp. Italian seasoning
1 tsp. lemon pepper
1 tsp. salt
½ tsp. pepper
4 cups vegetable broth
2 cups water
¼ cup chopped fresh parsley
Parmesan Cheese for serving

In a large heavy bottomed pot heat the olive oil over medium heat. Add the cauliflower, green beans, onion, carrot, celery and cabbage, cook for 8-10 minutes until they start to soften.
Add the garlic and cook 1-2 minutes longer.
Add the Italian seasoning, lemon pepper, salt and pepper and stir to combine.
Add the tomatoes, beans, broth and water. 
Bring to a boil, then reduce the heat and simmer for 20-30 minutes until the veggies are tender. 
Stir in the peas and corn and cook for 5 minutes or so until they are heated through.
Adjust seasonings as needed.
Finish off the soup with the chopped fresh parsley.
Serve a big bowl with some freshly grated Parmesan cheese on top.
Soup perfection!

Not only is this soup healthy and delicious but it super simple to make and takes no time at all.
Also, it freezes really well, so now I have t a week worth of lunches in the freezer for later!
Oh and, feel free to use whatever veggies you like… zucchini or potato or summer squash or bell peppers, the possibilities are endless!
I hope the start of your new year has been great! Here is to another year of great food.

Enjoy!

Jen